How Does babel-plugin-import Work

Babel 的处理流程

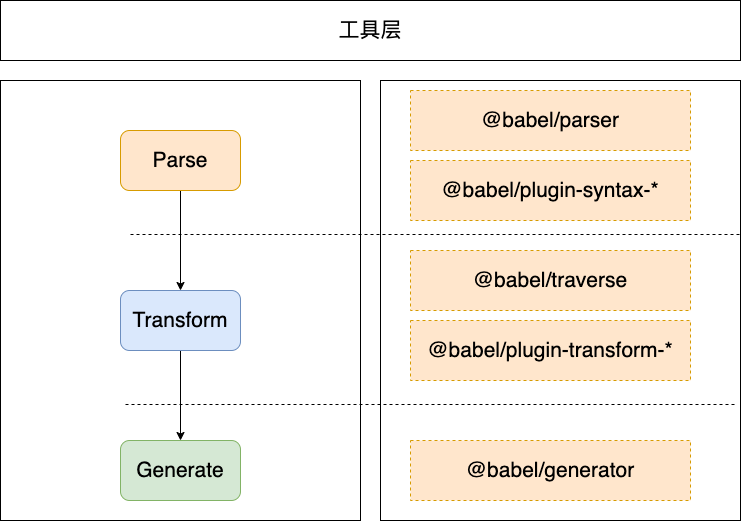
作为一个transpilerBabel处理的事情比较简单,就是将各种形式的源代码翻译成目标环境的代码,整个过程主要由三个部分组成,如下图所示:
Parse

将源代码转换为Abstract Syntax Tree(AST),Babel 相关的AST Node Types详见spec,这个过程会涉及到@babel/plugin-syntax-*相关的插件,并且这个过程不支持自定义插件,只能通过配置来增减需要的官方插件。整个 Parse 的过程我们基本上不需要做什么,Babel 会把最终的 AST 返回给我们以便进行后续的遍历和转换操作。

Transform

一般我们处理 AST 的做法就是对 AST 进行遍历,Babel 官方也提供了相关的工具@babel/traverse,它接受第一步 Parse 产生的 AST,然后通过@babel/plugin-transform-*@babel/plugin-proposal-*相关插件,定义不同AST Node Types的 visitor 来进行 AST 的处理和转换。对于比较复杂的场景,Babel 也提供了相应的@babel/helper-*来帮助处理和转换。对于AST Node Types的类型判断以及增加和改变,Babel 也专门提供了@babel/types。这个流程我们可以通过自定义插件来控制。

Generate

将第二步转换之后的 AST 传入@babel/generator,生成目标环境的代码。

babel-plugin-import解析

babel-plugin-import的主要作用是避免antd等包的无关模块引入的问题,可以减少最终 build 结果的大小,原理是将代码做如下转换:

1
2
3
4
5
6
7
8
import { Button } from 'antd';
ReactDOM.render(<Button>xxxx</Button>);

↓ ↓ ↓ ↓ ↓ ↓

var _button = require('antd/lib/button');
require('antd/lib/button/style/css');
ReactDOM.render(<_button>xxxx</_button>);

babel-plugin-import的源码也比较少,我们主要聚焦在Plugin.js

ImportDeclaration

babel-plugin-import主要是对import { Button } from 'antd';这样的形式进行转换,那么首先我们需要关注的就是对import的处理,我们先去spec查询到关于ImportDeclaration的作用和定义:

An import declaration, e.g., import foo from “mod”;.

1
2
3
4
5
6
7
interface ImportDeclaration <: ModuleDeclaration {
type: "ImportDeclaration";
importKind: null | "type" | "typeof" | "value";
specifiers: [ ImportSpecifier | ImportDefaultSpecifier | ImportNamespaceSpecifier ];
source: Literal;
attributes?: [ ImportAttribute ];
}

然后看一下源码对这块的处理:

1
2
3
4
5
6
7
8
9
10
11
12
13
14
15
16
17
18
19
20
21
ImportDeclaration(path, state) {
const { node } = path;

// path maybe removed by prev instances.
if (!node) return;

const { value } = node.source;
const { libraryName } = this;
const { types } = this;
const pluginState = this.getPluginState(state);
if (value === libraryName) {
node.specifiers.forEach(spec => {
if (types.isImportSpecifier(spec)) {
pluginState.specified[spec.local.name] = spec.imported.name;
} else {
pluginState.libraryObjs[spec.local.name] = true;
}
});
pluginState.pathsToRemove.push(path);
}
}

那么这里的主要作用是找到和传入的配置项libraryName相等的值,然后遍历相关node.specifiers并分别存入 import 的组件到specifiedlibraryObjs以便后续使用,其中specified存储的是类似于import { Button } from 'antd'这样的ImportSpecifier,libraryObjs存储的是类似于import antd from 'antd这样的ImportDefaultSpecifier和类似于import * as antd from 'antd这样的ImportNamespaceSpecifier,这两个的导入方式都是将整个包全部导入。且将当前path存入pathsToRemove数组,在最终Program.exit()阶段删除,也就是把示例中import { Button } from 'antd';这行代码进行删除操作,为什么删除,之后会讲到

CallExpression

import { Button } from 'antd';转换为var _button = require('antd/lib/button');之后对应的变量名称也随之改变,那么我们就需要关心调用这个步骤了,首先在 spec 中查询到关于CallExpression的作用和定义:

A function or method call expression.

1
2
3
4
5
interface CallExpression <: Expression {
type: "CallExpression";
callee: Expression | Super | Import;
arguments: [ Expression | SpreadElement ];
}

然后看一下源码对这一块的处理:

1
2
3
4
5
6
7
8
9
10
11
12
13
14
15
16
17
18
19
20
21
22
23
24
25
CallExpression(path, state) {
const { node } = path;
const file = (path && path.hub && path.hub.file) || (state && state.file);
const { name } = node.callee;
const { types } = this;
const pluginState = this.getPluginState(state);

if (types.isIdentifier(node.callee)) {
if (pluginState.specified[name]) {
node.callee = this.importMethod(pluginState.specified[name], file, pluginState);
}
}

node.arguments = node.arguments.map(arg => {
const { name: argName } = arg;
if (
pluginState.specified[argName] &&
path.scope.hasBinding(argName) &&
path.scope.getBinding(argName).path.type === 'ImportSpecifier'
) {
return this.importMethod(pluginState.specified[argName], file, pluginState);
}
return arg;
});
}

这段的主要作用是找到第一步存入specified的组件名称,并进行相应的替换,替换逻辑在importMethod

importMethod

这一步是进行转换的核心步骤,使用了@babel/helper-module-imports,该 helper 比较重要的方法示例如下:

1
2
3
import { addNamed } from '@babel/helper-module-imports';
// if the hintedName isn't set, the function will gennerate a uuid as hintedName itself such as '_named'
addNamed(path, 'named', 'source');

调用addNamed(path, 'named', 'source');会在 AST 中增加import { named as _named } from "source对应的结构,并在最终 generate 阶段生成该代码,并且返回相应的_named对应的Identifier,addSideEffectaddDefault的作用和addNamed类似。
知道了这些,我们来看一下importMethod的内部逻辑:

1
2
3
4
5
6
7
8
9
10
11
12
13
14
15
16
17
18
19
20
21
22
23
24
25
26
27
28
29
30
31
32
33
34
35
36
37
importMethod(methodName, file, pluginState) {
if (!pluginState.selectedMethods[methodName]) {
const { style, libraryDirectory } = this;
const transformedMethodName = this.camel2UnderlineComponentName // eslint-disable-line
? transCamel(methodName, '_')
: this.camel2DashComponentName
? transCamel(methodName, '-')
: methodName;
const path = winPath(
this.customName
? this.customName(transformedMethodName, file)
: join(this.libraryName, libraryDirectory, transformedMethodName, this.fileName), // eslint-disable-line
);
pluginState.selectedMethods[methodName] = this.transformToDefaultImport // eslint-disable-line
? addDefault(file.path, path, { nameHint: methodName })
: addNamed(file.path, methodName, path);
if (this.customStyleName) {
const stylePath = winPath(this.customStyleName(transformedMethodName));
addSideEffect(file.path, `${stylePath}`);
} else if (this.styleLibraryDirectory) {
const stylePath = winPath(
join(this.libraryName, this.styleLibraryDirectory, transformedMethodName, this.fileName),
);
addSideEffect(file.path, `${stylePath}`);
} else if (style === true) {
addSideEffect(file.path, `${path}/style`);
} else if (style === 'css') {
addSideEffect(file.path, `${path}/style/css`);
} else if (typeof style === 'function') {
const stylePath = style(path, file);
if (stylePath) {
addSideEffect(file.path, stylePath);
}
}
}
return { ...pluginState.selectedMethods[methodName] };
}

主要做了以下几点内容:

  1. 检测pluginState.selectedMethods是否存在methodName,不存在则在之后的逻辑中生成methodName对应的结果,存在则直接返回
  2. 依据传入的camel2DashComponentName,style等配置项,生成相应的 path 等,并调用addNamed(file.path, methodName, path);等生成对应的import { named as _named } from "source类似的结构,该过程在整个 traverse 过程只执行一次

MemberExpression

在某些情况下,我们会使用import antd from 'antdimport * as antd from 'antd来引入antd等包来使用,并在后续的使用中通过antd.Button这样的形式来使用,这种情况babel-plugin-import也考虑到了,依然是通过 spec 查询:

A member expression. If computed is true, the node corresponds to a computed (a[b]) member expression and property is an Expression. If computed is false, the node corresponds to a static (a.b) member expression and property is an Identifier or a PrivateName

1
2
3
4
5
6
interface MemberExpression <: Expression, Pattern {
type: "MemberExpression";
object: Expression | Super;
property: Expression;
computed: boolean;
}

再看一下这块的处理逻辑:

1
2
3
4
5
6
7
8
9
10
11
12
13
14
15
16
17
18
19
MemberExpression(path, state) {
const { node } = path;
const file = (path && path.hub && path.hub.file) || (state && state.file);
const pluginState = this.getPluginState(state);

// multiple instance check.
if (!node.object || !node.object.name) return;

if (pluginState.libraryObjs[node.object.name]) {
// antd.Button -> _Button
path.replaceWith(this.importMethod(node.property.name, file, pluginState));
} else if (pluginState.specified[node.object.name] && path.scope.hasBinding(node.object.name)) {
const { scope } = path.scope.getBinding(node.object.name);
// global variable in file scope
if (scope.path.parent.type === 'File') {
node.object = this.importMethod(pluginState.specified[node.object.name], file, pluginState);
}
}
}

主要做了如下两点内容:

  1. 类似于import * as antd from 'antd全包引入的方式,直接调用replaceWith替换antd.Button_Button
  2. 处理import { message } from 'antd'并且调用message的情况,将message替换为目标Identifier

buildExpressionHandler & buildDeclaratorHandler

对于逻辑判断和赋值等操作,babel-plugin-import也进行了处理,主要的逻辑都封装在了buildExpressionHandlerbuildDeclaratorHandler内,这两个函数的方法基本上都是判断并调用importMethod改变Identifier内容,这里不再赘述。

总结

babel 在整体架构上采用微内核的形式,将主要功能封装在@babel/parser,@babel/traverse,@babel/generator几个包内,其它次要功能通过引入各种插件实现,整体架构较为灵活,可以应对不断变化的tc39提案更新。同时基于这样的架构,用户也可以参与并控制相关流程,促进了相关生态。但是架构灵活所带来的问题往往是核心功能往往较为难以理解,同时官方文档对这一块的部分描述语焉不详,这就更导致了开发 babel plugin 的难度增加。希望通过本篇文章,能加深读者对 babel 周边生态的认识。

链接

扩展阅读

Comments